This tutorial will cover creation of Provider Hosted App in SharePoint 2013 On-Premise using Visual Studio 2012. We’ll discuss complete Configuration and settings required to create a provider hosted app with a step by step approach.Also In a Continuing Article we’ll share procedure to Publish Your App in Front-End Server(Client Side) with Some Trouble Shooting tips.SharePoint App Model has become popular among developers , you can realize this by seeing progressive graph of number of Apps in SharePoint App Store.
Microsoft Introduces Apps Model in its SharePoint 2013 Model having “Everything is an App” Policy.We are provided with three Kind of Apps:
- SharePoint Hosted Apps
- Provider Hosted Apps
- Auto Hosted Apps
To know More About all these Apps Refer this Link.
We’ll go with Provider Hosted App in this article.
Prerequisites
You need to set your SharePoint Application Server with these required Software’s:
1.Windows Server 2008 R2 OS -64 Bit/Windows 7 and other Variant.
2.Microsoft Sharepoint 2013 Server – Enterprise Edition(For Enhanced Functionality).
3.Visual Studio 2012- Professional/Ultimate.
4.Microsoft Office Developer Tools for Visual Studio 2012 (RTM).
5.Microsoft Web Deploy – v3.0 or higher(Required for Publishing Apps).
6.Microsoft Exchange Web Services-EWS Managed API 2.0 or Latest.
Some Server Level Settings:
1.Check below mentioned Services are up and running on Server
Central Admin -> System Settings -> Manage Services on Server.
1.Check below mentioned Services are up and running on Server
Central Admin -> System Settings -> Manage Services on Server.
(1) App Management Service.
(2) Claims to Windows Token Service.
(3) Microsoft SharePoint Foundation Subscription Settings Service.
(4) Request Management Service.
(5) User Profile Synchronization Service.
(2) Claims to Windows Token Service.
(3) Microsoft SharePoint Foundation Subscription Settings Service.
(4) Request Management Service.
(5) User Profile Synchronization Service.
2.Features to be activated at Web Application Level
Central Admin ->Application Management -> Manage Web Application Features (in ribbon control)
Apps that require accessible internet facing endpoints (For SharePoint Store- optional).
Central Admin ->Application Management -> Manage Web Application Features (in ribbon control)
Apps that require accessible internet facing endpoints (For SharePoint Store- optional).
Open Visual Studio “Run As Administrator”. -> New Project -> Find Apps for SharePoint 2013 Under Office/SharePoint Template Group.


Note:
(1)If you are facing Error “An error occurred whilst trying to load some required components, Please ensure the following prerequisite components are installed…” . referThis Link to resolve this.
(2)Also you need to Run Visual Studio with System Admin Account also Farm Admin for Sharepoint Server. But this account should not be used while configuring and installing SharePoint Farm otherwise you will face Error.You won’t be able to deploy it.Same issue has been Listed On MSDN Forum here…, To resolve this you can create a new Account in Active Directory , Add it in System Administrators Group and also add it as Farm Admin. Run using this account.
- In Next Page VS will ask for name for the App, Debugging location (Site collection URL where you want to deploy) and Type of hosting.Choose Provider Hosted from the drop down list and click next.
- You’ll see that the New Solution for Provider Hosted App is Ready.The Solution will contain two projects one App and one Web. In Web Project we have TokenHelper.cs Class it contains Methods to setup trust across Server and authenticate client for accessing this app.

- Now Select Web Project & Right Click->Properties.Under Web tag you can use IIS Express or custom IIS Web Server.For IIS Server in Project URL you will have like http://localhost/{Project-Name} for Port:80. Click on Create Virtual Directory button , it will create a virtual directory for your app in IIS Server under Site SharePoint -80 having Port 80.You can create under any other site also changing the Port Number.
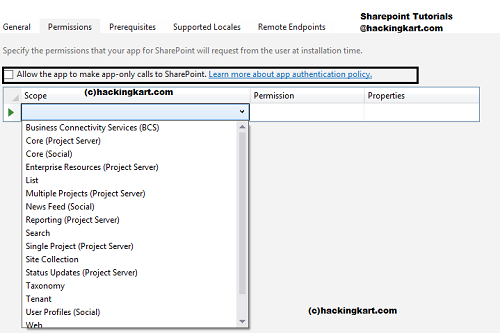
- Now in App Project Double click on AppManifest.xml file in App Project. And go under Permissions Tab there add Scope to Web, Site Collection, Lists, Taxonomy, User Profiles and other fields depending upon your Requirement.These are permissions you gonna give to your App or user depending upon the App policy You chose.
 After that right click on AppManifest.xml and choose view Code. You will find all permissions given above inside
tag. And put AllowAppOnlyPolicy attribute set to true for App Only App policy i.e App having Elevated Privileges in one way. - Now we need one ClientId for our app registered as an App Principle for SharePoint.Learn how to register App Principal here.
Registering an App Principal
For each App we’ll need a Client Id registered with Sharepoint. We need to register it before deploying our app.Client Id is just a GUID with all letters in small case. We can generate a GUID for this via following Page. URL will be likehttp://Root-url/_Layouts/15/appregnew.aspx
We’ll use above App Id as our Client Id and register it with Sharepoint. We have PowerShell script for this, shown below:
cls
Add-PSSnapin "Microsoft.SharePoint.PowerShell"
# set intialization values for new app principal
$appDisplayName = "(Identifier-name)"
$clientID = "(Generated-ClientId-Above)"
$targetSiteUrl = "(Site-URL)"
$targetSite = Get-SPSite $targetSiteUrl
$realm = Get-SPAuthenticationRealm -ServiceContext $targetSite
$fullAppPrincipalIdentifier = $clientID + '@' + $realm
Write-Host "Registering new app principal"
$registeredAppPrincipal = Register-SPAppPrincipal -NameIdentifier $fullAppPrincipalIdentifier -Site $targetSite.RootWeb -DisplayName $AppDisplayName
$registeredAppPrincipal | select * | Format-List
$registeredAppPrincipal | select * | Format-List | Out-File -FilePath "Output.txt"
Write-Host "Registration Completed"
#Get-SpAppPrincipal -?
Note: Above mentioned values in (), has to be chnaged according to your setup, where:
(Identifier-name):- Name of App Identifier you need to use for Registering App Principal.
(Generated-ClientId-Above):- ClientID generated above from App registration Page.
(Site-URL):-Target Site Collection URL. - Now this ClientID we need to replace in Two Places. One in Web.Config under Web Project you will find all values given previously for Cerificare in
tag. Put Value for ClientID that we just registered & other in Appmanifest.xml file under App Project. - That’s It.Now just press F5 in debug mode.It will go through a series of Steps and end with Deployment.After deployment it will open App Principal Trust Page.As the app is going to access resources, so it’ll ask you if you trust this app or not.This page will come once only for the first time after deployment, until you retract it again.

- Trust it, it will redirect to Default.aspx(Default aspx web form) page deployed locally.The Url will be like
http://localhost/{Project-Name}/Pages/Default.aspx?{StandardTokans}
This URL is set in AppManifest.xml under:~remoteAppUrl/Pages/Default.aspx?{StandardTokens} 

Next you need to give Authentication Settings , you can see two options in RadioButton, First is using ACS(Low-Trust Apps) and second is using a Certificate(High-Trust Apps). Choose second option Use a Certificate. Insert Certificate location, password and Issuer ID. How to Create OAuth Certificate In SharePoint 2013 For High-Trust Apps.Also that certificate has to be registered under SPTrustedSecurityTokenIssuer.Lean how to Register Here.


No comments:
Post a Comment